
Views: 0 Author: Site Editor Publish Time: 2026-07-24 Origin: Site


Precision in woodworking and fabrication is dictated not by the router itself, but by the geometry, material composition, and rotational stability of the cutting tool. Fabricators and woodworkers face a heavily saturated tooling market. Selecting the wrong profile, shank size, or carbide grade leads to compromised structural joints, severe material tear-out, ruined workpieces, and increased safety hazards. This guide provides a systematic framework for evaluating and deploying specific Router Bits for grooving, trimming, and edging applications, ensuring high-tolerance cuts, optimal tool longevity, and scalable production quality. We break down shank physics, carbide grades, and application-specific geometries so you can stop burning stock and start cutting with absolute confidence.
Shank Diameter Dictates Stability: Default to 1/2-inch shanks whenever router collet capacity allows to minimize deflection, reduce vibration, and increase the sheer mass of the bit for heat dissipation.
Application-Specific Geometry: Grooving requires efficient chip evacuation (spiral bits), trimming relies on precise bearing placement (pattern router bits), and edging demands multi-pass horsepower management.
Material Quality Over Quantity: High-density carbide-tipped or solid carbide bits drastically outperform High-Speed Steel (HSS) in longevity and cut quality, altering the ROI calculation for tooling investments.
Strategic Procurement: While Router Bit Starter Kits offer baseline utility for broad applications, specialized or high-volume production requires a la carte investment in premium, application-specific profiles.
Achieving chatter-free cuts requires a deep understanding of tool anatomy. You must maintain edge sharpness over extended linear footage. This ensures absolute dimensional accuracy across every workpiece. When you run hundreds of feet of hardwood through a router table, the tooling takes a massive beating. Heat buildup and abrasive wood fibers degrade cutting edges rapidly. Understanding the physical properties of your cutters prevents premature failure and ruined stock.
You must evaluate the physical limitations of 1/4-inch versus 1/2-inch shanks. A 1/2-inch shank offers significantly more mass. This extra mass reduces vibration and dissipates heat faster. Heavy feed rates cause thin shanks to deflect. Bit deflection ruins cut tolerances and creates wavy edges. Always maximize your collet capacity. When a 1/4-inch shank deflects under load, the cutting edge bites into the wood at an inconsistent angle. This causes chatter marks that require hours of sanding to remove. The larger surface area of a 1/2-inch shank also provides better grip inside the collet, preventing the cutter from creeping upward during heavy plunge cuts.
Determine which profiles require a fixed table setup. Large-diameter architectural profiles demand the stability of a router table. Structural joinery also requires fixed fences. Conversely, light edge-treatments are safe for handheld operations. Template trimming works well with handheld compact routers. Running a 3-inch panel raising profile in a handheld router is a massive safety hazard. The torque generated by large cutters will easily rip the tool from your hands. Table-mounted setups allow you to use featherboards and push sticks, keeping your hands away from the spinning carbide while maintaining consistent pressure against the fence.
Material composition dictates tool lifespan. High-Speed Steel (HSS) offers a low initial cost but dulls rapidly. Carbide-tipped options represent the industry standard. They are brittle but highly durable. Solid carbide is superior for small diameters and spiral geometries. Micro-grain carbide ratings impact edge retention directly. Abrasive materials like MDF, plywood, and high-pressure laminates require high-density micro-grain carbide. Standard carbide degrades quickly when cutting the glue layers found in manufactured sheet goods. Upgrading to a sub-micrograin carbide extends the cutting life significantly, reducing the frequency of tool changes during large production runs.
Material Type | Durability | Best Application | Cost Profile | Sharpening Potential |
|---|---|---|---|---|
High-Speed Steel (HSS) | Low | Softwoods, infrequent use | Low | High, easily honed |
Standard Carbide-Tipped | High | Hardwoods, general shop use | Medium | Requires diamond abrasives |
Micro-Grain Solid Carbide | Very High | MDF, laminates, CNC routing | High | Professional service required |
Insert Tooling (Replaceable) | Extreme | High-volume production runs | Very High Initial | None (Replace inserts) |
Improper setup leads to catastrophic failures. Collet bottoming prevents the collet from tightening properly. If you drop the cutter all the way to the bottom of the armature shaft, the collet cannot compress evenly. Always insert the shank fully, then back it out about 1/16 of an inch before tightening. Improper seating depth causes severe vibration. Running oversized cutters at maximum RPMs introduces extreme safety hazards. Always consult speed charts for large diameter profiles. A 3.5-inch diameter cutter should never spin faster than 12,000 RPM. Exceeding this limit can cause the carbide tips to fracture and launch across the shop like shrapnel.
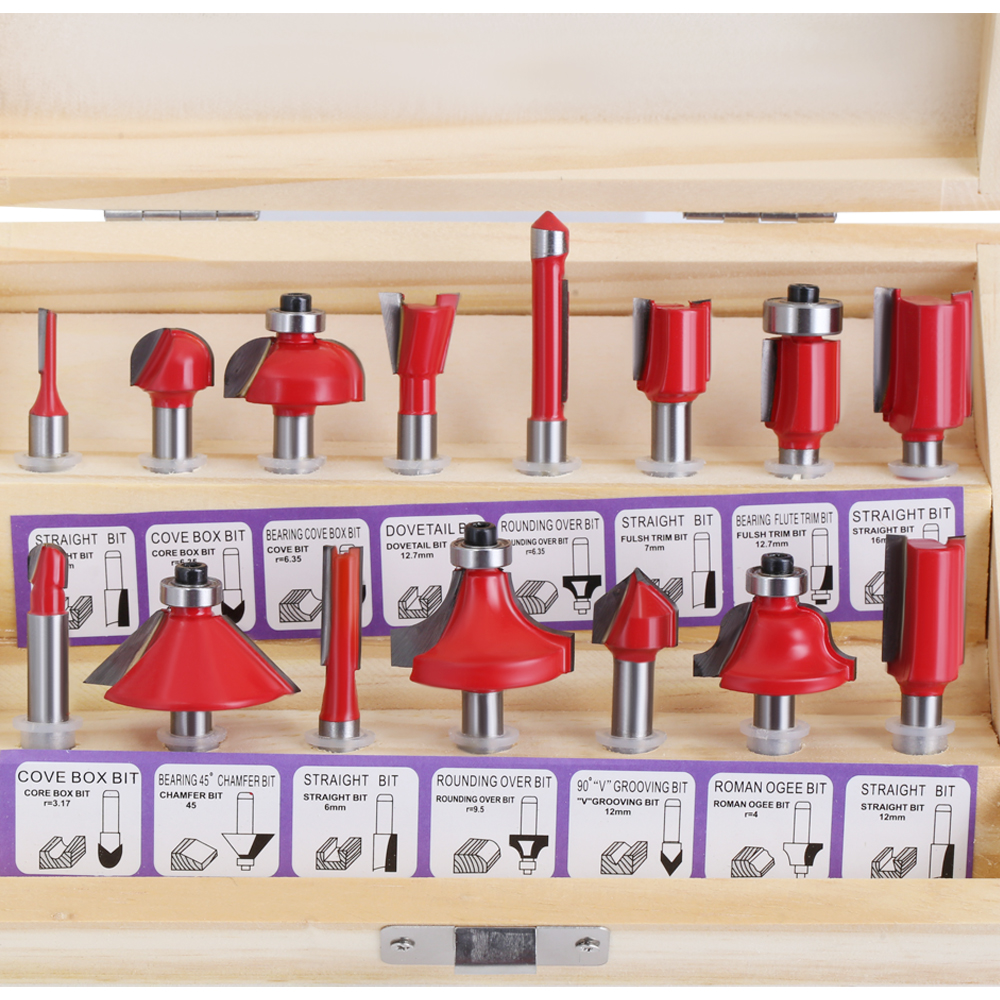
Grooving operations require aggressive material removal. Dados, grooves, rabbets, and mortises challenge your equipment. You must manage chip clearing simultaneously. Poor chip evacuation causes burning and premature tool failure. When chips get trapped in a tight groove, they rub against the spinning cutter. This friction generates intense heat, which destroys the temper of the steel body and degrades the carbide binder. Efficient chip ejection is just as important as a sharp cutting edge.
Routing with the wood grain creates a groove. Routing across the grain creates a dado. Severing wood fibers perpendicularly requires specific shear angles. Proper cutting-edge geometry prevents tear-out on cross-grain cuts. When cutting a dado in oak or maple, the fibers want to splinter upward as the cutter exits the cut. Using a cutter with a slight down-shear angle pushes those fibers downward, leaving a crisp, clean shoulder on the joint. Grooves cut parallel to the grain are less prone to splintering, but they still require sharp tooling to prevent fuzzy interior walls.
Standard straight cutters work well for shallow, edge-accessible grooves. However, solid carbide spiral cutters offer superior performance. Upcut spirals provide rapid chip evacuation in deep mortises. Downcut spirals leave pristine top-surface veneers. Compression spirals combine both for double-sided laminates. If you plunge a standard straight cutter into hardwood, it will struggle to clear the waste. An upcut spiral acts like an auger, pulling the chips up and out of the hole. This keeps the cutter cool and prevents the router from bogging down under load.
Select an upcut spiral for deep mortises where chip clearing is the primary concern.
Choose a downcut spiral for shallow dados on veneered plywood to prevent surface splintering.
Deploy a compression spiral when cutting completely through double-sided melamine or laminate on a CNC machine.
Use standard straight cutters for edge rabbets where chips can easily escape out the side.
V-Groove and Core Box profiles serve specific decorative functions. They excel at engraving and sign-making. You can create decorative faux-panel grooves on doors. They add custom details to furniture faces. A 90-degree V-groove cutter is standard for lettering, while a core box cutter leaves a smooth, rounded bottom perfect for juice grooves on cutting boards. When running these profiles, feed rate consistency is critical. Pausing in the middle of a cut will leave a burn mark that is incredibly difficult to sand out of a concave profile.
Matched two-piece tongue and groove sets offer reliable precision. Single, adjustable combination cutters cut both profiles. You rearrange slot cutters and spacers on a single arbor. Setup requires high-precision alignment. You need a router table and micro-adjust fences. Exact stock thickness matching is absolutely critical. If your stock varies by even 1/64 of an inch, the joints will not sit flush. Always mill your lumber to final thickness in a single batch before setting up your tongue and groove tooling. Use brass setup bars to dial in the exact height of the cutter relative to the router table surface.
Heat buildup is a major risk in deep channels. Enclosed cuts trap chips and burn the wood. Implement multi-pass depth strategies to mitigate this. Never cut deeper than half the cutter diameter per pass. Optimize your feed rates based on material density. If you push the router too fast, you risk snapping the cutter. If you move too slowly, you will burn the wood. Listen to the pitch of the router motor. A smooth, consistent hum indicates a good feed rate. If the motor whines and bogs down, you are taking too heavy of a pass.
Duplicating parts requires referencing an existing surface. Finishing edge-banded substrates demands precise tools. You need cutters that follow a template without gouging the master profile. Template routing allows shops to produce identical curved parts rapidly. Whether you are building arched door panels or custom guitar bodies, bearing-guided tooling is the foundation of repeatable accuracy.
Bottom-bearing flush trim cutters excel at laminate trimming. They handle wood veneer flush-cutting flawlessly. Shear angles are critical for these tasks. Slight angles on the cutting edge reduce tear-out on cross-grain cuts. When trimming high-pressure laminate on a countertop, a standard straight flush trim cutter can leave a harsh edge. A slight down-shear angle pushes the laminate tight against the substrate while cutting, preventing the glue line from chipping out. Always keep the router base flat on the workpiece to prevent the bearing from losing contact with the reference edge.
Template routing requires specific top-bearing configurations. The template sits above the workpiece in these setups. Pattern Router Bits allow you to follow complex shapes safely. Double-bearing options feature bearings on top and bottom. They handle complex grain-direction routing easily. You can flip the workpiece to avoid hazardous climb-cutting. When routing a curved chair leg, the grain direction changes relative to the template. Cutting against the grain causes massive tear-out. A double-bearing cutter lets you route half the profile, flip the template assembly over, and route the other half while always cutting downhill with the grain.
Cheap bearings have a high failure rate. A seized bearing instantly burns the template. It will ruin the workpiece in seconds. Establish strict preventative maintenance steps. Clean resin buildup regularly. Replace worn bearings before critical failures occur. Wood pitch and glue squeeze-out easily pack into the dust shields of small bearings. Once the bearing stops spinning, it acts like a friction brake against your template. Spray your bearings with a dry Teflon lubricant after cleaning them with citrus solvent. Never use WD-40, as it attracts dust and will gum up the bearing faster.
Bearing Issue | Symptom | Immediate Action |
|---|---|---|
Resin Buildup | Sluggish rotation, sticky feel | Soak in blade cleaner, apply dry lube |
Seized Bearings | Template burning, black marks | Stop immediately, replace bearing |
Worn Dust Shields | Grinding noise during operation | Discard and install new bearing |
Loose Retaining Screw | Bearing wobbles on the arbor | Tighten with hex key, apply threadlocker |
Architectural details require complex profiles. Casing and edge softening remove varying amounts of material. These tasks demand strict tool control. Strategic workpiece orientation is mandatory. Cutting a large crown molding profile requires removing a massive volume of wood. You cannot do this in a single pass. You must break the operation down into manageable steps to maintain cut quality and protect your equipment.
Roundovers provide basic edge softening. Chamfers handle beveling and joinery prep. Ogees offer classic architectural detailing for bookcases. They elevate cabinets and custom tables. Transitioning from pilot bearings to fence-guided forming is necessary. Oversized architectural profiles require fence support. When running a large Roman Ogee, the pilot bearing is often not enough to stabilize the cut. Burying half the cutter in a sacrificial wooden fence allows you to expose only the exact portion of the profile you need. This provides continuous support for the workpiece and drastically improves safety.
Cutter diameter dictates required router horsepower. A 3-1/2 inch panel raising profile requires a 3+ HP table-mounted router. RPM reduction is mandatory for large mass tools. Slower rotational speeds maintain safe tip velocity. This prevents dangerous tool chatter. A standard 1.5 HP handheld router will stall immediately if you try to spin a massive panel raiser. You need heavy-duty 15-amp motors to maintain torque under load. Always adjust your variable speed dial before turning the machine on. Spinning a 3-inch cutter at 22,000 RPM is a recipe for disaster.
Verify the router is unplugged before installing any large diameter cutter.
Set the router speed dial to the lowest setting (typically 10,000 to 12,000 RPM).
Position the router table fence so the cutter is partially buried, exposing only the necessary profile.
Adjust the height to take a shallow first pass, removing no more than 1/8-inch of material.
Run the stock through, then raise the cutter incrementally for subsequent passes until the final profile is achieved.
End-grain transitions invite severe tear-out. Delicate edge corners are highly vulnerable. Utilize sacrificial backer boards to eliminate blowout. Sequence your cuts strategically. Route end-grain first, then long-grain to clean up corners. Always employ incremental depth passes. When routing the perimeter of a square table top, the corners will blow out if you route the long grain first. By routing the two end-grain sides first, any tear-out at the corners will be completely removed when you route the long-grain sides. This simple sequencing trick saves countless hours of repair work.
You must balance upfront capital expenditure against long-term durability. Project-specific requirements dictate your tooling strategy. Smart investments yield better shop efficiency. Buying cheap tools twice is more expensive than buying the right tool once. However, dropping thousands of dollars on specialized profiles you may never use is poor capital management. You need a strategic approach to building your tooling inventory.
Prototyping and educational environments benefit from bundled sets. Low-frequency general maintenance tasks also justify them. Router Bit Starter Kits offer baseline utility. However, trade-offs exist. They often feature lower-grade carbide. You will receive redundant or rarely used profiles. Bearing failure rates are typically higher. A 70-piece kit looks impressive, but you will likely only use the straight cutters, roundovers, and flush trims. The complex architectural profiles in budget kits often suffer from poor balance and excessive runout. Use kits to figure out which profiles you use most frequently, then replace those specific ones with premium versions as they wear out.
High-frequency tasks require premium, individual cutters. Investing heavily in a premium compression spiral pays off. High-end flush trim tools elevate cabinetry work. The ROI on application-specific profiles is substantial. If your shop builds custom MDF doors all day, spending $150 on a single, high-performance solid carbide compression spiral is a mandatory investment. That single tool will outlast twenty budget straight cutters and eliminate the need for post-cut sanding. Build your inventory around your actual production bottlenecks.
Factor in the cost of professional sharpening services. Premium cutters can be sharpened multiple times. Budget tooling is entirely disposable. Premium tools offer a lower true cost over time. A high-quality carbide cutter has thick enough brazed tips to withstand three or four trips to a professional grinding service. Each sharpening costs a fraction of the price of a new tool. Budget cutters use razor-thin carbide that cannot be reground. Once they dull, they go straight into the trash.
The successful execution of grooving, trimming, and edging operations relies on strict tool selection. Selecting the correct geometry prevents ruined workpieces. Prioritizing 1/2-inch shanks ensures rotational stability. Utilizing high-quality carbide guarantees clean cuts over long production runs. Stop fighting your equipment and start matching your tooling to the specific demands of the material and the cut.
Audit your current router collet capabilities to determine maximum shank size compatibility for future purchases.
Identify the primary material being cut in your shop to select the appropriate carbide grade and geometry.
Procure specific, premium profiles required for your immediate production run rather than relying on generic sets.
Implement a strict bearing maintenance schedule to clean resin and prevent template damage.
Establish a relationship with a local tooling sharpening service to extend the lifespan of your premium cutters.
A: A flush trim bit has the guide bearing at the bottom, referencing a template placed under the workpiece. Pattern bits have the bearing at the top, referencing a template placed on top of the workpiece. Both duplicate parts but require different template placements based on your jig setup.
A: They provide a cost-effective way to acquire many profiles for prototyping or occasional use. However, professionals doing high-volume production should invest in premium, individual cutters for better carbide quality, longer lifespan, and superior cut finishes.
A: Burning occurs due to poor chip evacuation, dull cutting edges, or feeding the material too slowly. Heat builds up rapidly in enclosed grooves. Use sharp cutters, optimize your feed rate, and take multiple shallow passes instead of one deep cut.
A: Always use a 1/2-inch shank if your router collet accepts it. The larger mass reduces vibration, minimizes deflection under load, and dissipates heat more effectively, resulting in cleaner cuts and safer operation.
A: Prevent tear-out by taking multiple shallow passes rather than removing all material at once. Route the end-grain sides of your workpiece first, followed by the long-grain sides. Use a sacrificial backer board to support wood fibers as the cutter exits.
A: Spiral bits maintain continuous contact with the wood, providing a smoother shearing action. Upcut spirals pull chips out of deep mortises efficiently, while downcut spirals push fibers down to leave a perfectly clean top edge on veneers and laminates.
