
Views: 0 Author: Site Editor Publish Time: 2026-07-05 Origin: Site


The quality of a routed finish and the lifespan of the tool depend heavily on matching the correct cutting geometry and material composition to the workpiece. Using the wrong tooling leads to tear-out, material burning, and catastrophic tool failure. Woodworkers and machinists face an overwhelming saturation of tooling options. Selecting the appropriate profile, shank size, and flute geometry requires balancing production efficiency, finish quality, and safety requirements. This guide provides an evidence-based framework for evaluating and selecting Router Bits based on machine type, material properties, and specific application requirements. Moving beyond basic starter sets to production-grade tooling decisions ensures you maximize spindle uptime and minimize material waste. We will break down shank rigidity, carbide grades, and flute geometries so you can match the exact cutter to your specific stock.
Shank Diameter Dictates Stability: Always prioritize 1/2-inch shanks over 1/4-inch shanks when the collet allows, as the increased mass reduces vibration, minimizes deflection, and improves heat dissipation.
Material Matching is Non-Negotiable: High-Speed Steel (HSS) is cost-effective for limited softwood runs, but Carbide-Tipped or Solid Carbide is mandatory for abrasive materials like MDF, plywood, and hardwoods.
Geometry Controls the Chip Load: For CNC and precision joinery, selecting between upcut, downcut, and compression spiral bits directly determines top-surface and bottom-surface finish quality.
Application Drives the Profile: Categorize purchasing decisions into edge forming, joinery, and surfacing to avoid over-investing in redundant profiles.
Shank diameter serves as the foundation of tool stability and directly impacts the quality of your cut. Common sizes include 1/4-inch, 8mm, and 1/2-inch shanks. A 1/2-inch shank offers significantly more mass than a 1/4-inch shank, providing a rigid backbone that resists deflection under heavy chip loads. Tool deflection occurs when the lateral force of the cut bends the bit slightly, causing uneven cuts, chatter marks, and accelerated edge wear. Standard router collets handle basic handheld tasks, but high-precision CNC ER collets provide superior grip and concentricity. This allows operators to run bits safely at higher RPMs without introducing runout.
Shank Size | Primary Application | Deflection Resistance | Vibration Dampening |
|---|---|---|---|
1/4-inch | Light edge trimming, palm routers, detail work | Low | Poor |
8mm | European standard routers, medium duty joinery | Moderate | Fair |
1/2-inch | Heavy stock removal, CNC operations, table routing | High | Excellent |
The material of the cutting edge dictates how long the tool remains sharp and what materials it can cut effectively without degrading. Selecting the wrong material guarantees premature tool failure.
High-Speed Steel (HSS): HSS bits offer a very sharp initial edge. They work well for non-abrasive softwoods like pine or cedar but dull rapidly when cutting harder materials or engineered composites.
Carbide-Tipped (Brazed): These represent the industry standard for general shop use. A high-quality micro-grain carbide edge brazed to a steel body provides durability and impact resistance. The thickness of the carbide dictates how many times the bit can be professionally resharpened.
Solid Carbide: Solid carbide is necessary for high-stress, high-heat applications. These bits dissipate heat effectively and maintain their edge longer under continuous load, making them essential for automated environments.
Polycrystalline Diamond (PCD): PCD tooling is engineered for high-volume, continuous industrial production. It excels in highly abrasive composites, laminates, and fiberglass where standard carbide would fail within minutes.
Flute geometry determines how the cutting edge engages the wood fibers. Straight flutes chop directly into the material, which can cause tear-out on figured grain. Bits engineered with shear angles slice the wood fibers at an angle, drastically reducing cutting resistance. A slight 3-degree to 5-degree shear angle changes the cutting dynamics from a harsh impact to a smooth slicing motion, resulting in cleaner finishes and less strain on the spindle bearings.
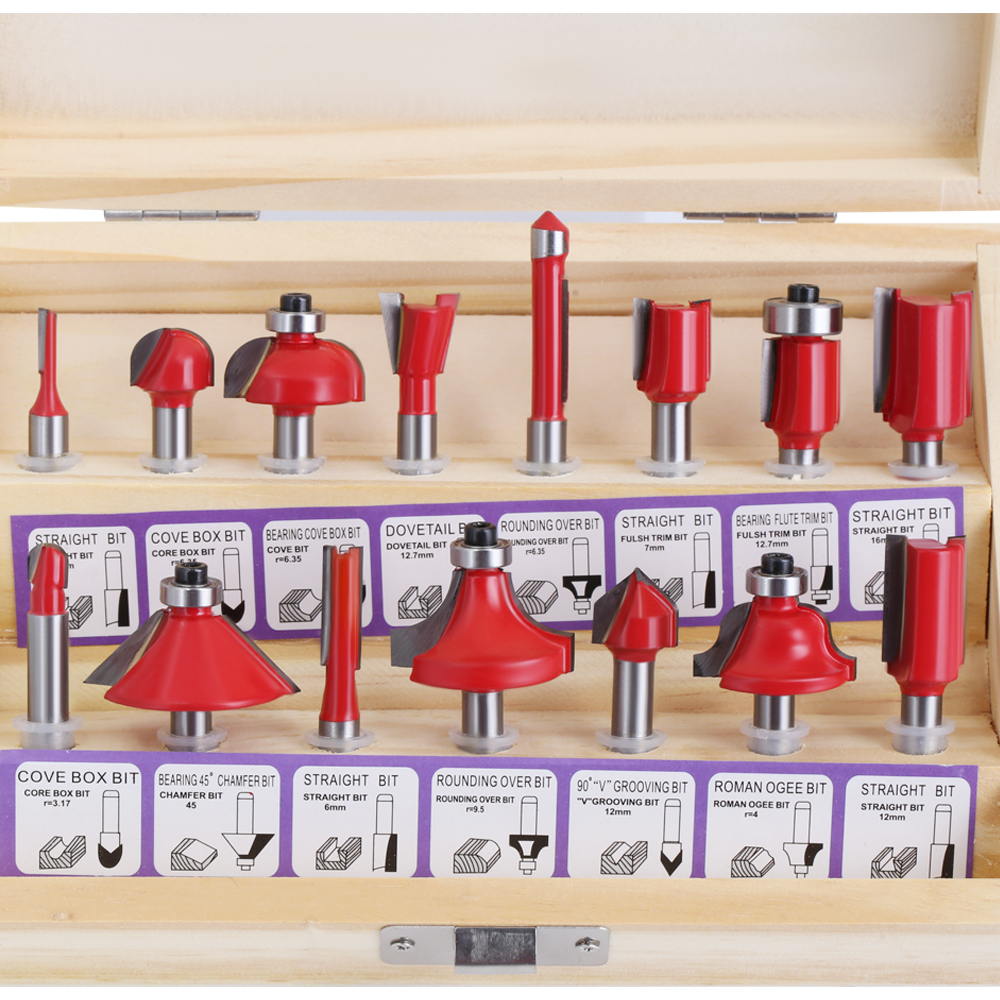
Building a reliable core set of Woodworking Router Bits allows you to handle the majority of routing tasks efficiently without constantly swapping specialized profiles.
Straight-Cutting Bits: These form the foundation for cutting grooves, dados, and rabbets. They are the workhorses of basic joinery.
Spiral Bits (Upcut/Downcut): Spiral bits offer a modern upgrade to straight bits. They provide cleaner chip evacuation and a continuous shear action that reduces tear-out on delicate faces.
Flush-Trim Bits: Equipped with pilot bearings, these bits allow for exact duplication of templates and trimming of overhanging veneers.
Rabbeting Bits: By using interchangeable bearing sets, a single rabbeting bit can cut various step depths, making it highly versatile for cabinet backs and inset panels.
Slot-Cutters: These dedicated thin-profile cutters are ideal for tongue-and-groove joinery, splines, and biscuit slots.
Decorative bits add finishing touches and functional edges to your projects, transforming square stock into finished components.
Roundover and Cove Bits: These are the standard profiles for easing sharp edges, preventing splintering, and creating matching rule joints on drop-leaf tables.
45° Chamfer Bits: Essential for cutting bevels, softening edges, and facilitating multi-sided construction like octagonal columns.
Roman Ogee Bits: This classic profile provides decorative edge detailing for traditional furniture and cabinetry.
Undersized Plywood Bits: Engineered specifically to match the actual nominal thickness of sheet goods. Plywood is rarely a true 3/4-inch or 1/2-inch. Using bits sized at 23/32-inch or 15/32-inch eliminates sloppy joints in casework.
Cutting mortises, box joints, and dovetails requires absolute precision. Deep blind cuts generate significant mechanical stress and heat because the chips have nowhere to escape. Adjusting your feed path and taking multiple shallower passes prevents material binding and reduces the risk of snapping the bit. Proper chip evacuation is critical in deep grooves to prevent the tool from overheating and losing its temper. When routing deep mortises, operators should clear the slot frequently with compressed air or a vacuum system.
Flush trimming relies on a bearing to follow a template perfectly. Straight-flute flush trim bits work well for general tasks, but spiral flush trim bits offer a smoother cut with less resistance. Compression flush trim bits provide a distinct advantage when routing highly figured woods or alternating grain directions. They pull the fibers toward the center of the cut, ensuring a tear-out-free finish on both the top and bottom edges simultaneously. This is particularly useful when working with expensive burls or cross-grained laminations.
Automated operations require specific tooling geometries to maximize efficiency and finish quality across large sheets of material.
Spoilboard Surfacing Bits: Also known as fly cutters, these wide-diameter bits are used for bed flattening and maintaining vacuum tables to ensure a perfectly coplanar cutting surface.
V-Carving Bits (60°, 90°): These bits are essential for high-detail sign-making, crisp lettering, and creating sharp chamfers on MDF doors.
Tapered Ball-Nose Bits: Designed for 3D topographical profiling and deep carving, the tapered profile adds massive strength to the fine tip, preventing breakage during long carving files.
Chipbreaker/Roughing Bits: These bits feature serrated edges for rapid, high-speed material removal before a final finishing pass. They break the chips into tiny pieces, preventing the dust collection system from clogging.
Grain direction significantly impacts bit selection and feed direction. When routing highly figured hardwoods like bird's eye maple, curly cherry, or white oak, selecting bits with steep shear angles helps slice the fibers cleanly. This prevents severe tear-out that ruins expensive stock. Softwoods like pine are more forgiving but can crush or fuzz if the bit is dull or the feed rate is too high. Always ensure your cutting edges are honed when transitioning from hardwoods to softwoods to maintain a crisp edge.
Sheet goods with delicate face veneers require specialized geometries to prevent chipping. Compression bits combine upcut and downcut flutes on the same cutting edge. This design compresses the material toward the center of the core, simultaneously cutting the top and bottom delicate veneer layers cleanly. When cutting double-sided melamine, a compression bit is the only reliable way to achieve a chip-free edge on both faces without scoring the material first.
MDF and particleboard contain highly abrasive binders and glues that dull standard steel edges rapidly. The density of these materials generates extreme heat at the cutting edge. In production environments, using micro-grain solid carbide or diamond-tipped tooling is necessary to mitigate rapid edge wear and maintain consistent cut quality. Standard carbide will lose its razor edge quickly, leading to fuzzy cuts that require excessive sanding.
Routing acrylic, polycarbonate, and aluminum requires careful heat management. Standard wood geometries will melt plastic or weld aluminum to the cutter. Single-flute "O-flute" geometries provide maximum space for chip evacuation. Clearing chips quickly reduces heat buildup, preventing plastic from welding back together behind the cut or aluminum from galling onto the cutting edge. Applying a mist coolant or compressed air blast directly to the cut zone further stabilizes the temperature.
Understanding how a bit enters the material dictates the toolpath strategy. Center-cutting bits have cutting edges that extend all the way to the center of the tool, allowing them to plunge vertically into the material like a drill bit. Non-center-cutting bits lack this geometry and require a ramped entry path. Ramping moves the bit laterally while plunging, clearing material safely without burning the bottom of the bit or breaking the tip.
Spiral CNC Router Bits manage chips and cut quality differently based on their flute direction. Selecting the wrong spiral direction ruins the workpiece.
Upcut: These bits pull chips up and out of the cut, making them superior for deep mortises and blind slots. However, the upward lifting action can cause top-surface tear-out and may lift thin workpieces off the vacuum table if hold-down is insufficient.
Downcut: These bits push chips downward, leaving a pristine top edge and helping to secure thin materials against the table. The drawback is the risk of heat buildup and chip packing in blind pockets, which can ignite the dust or snap the tool.
Feed direction affects cut quality, tool deflection, and operator safety. Climb milling moves the router in the direction of the cutter's rotation, while conventional milling moves against the rotation. Climb milling leaves a cleaner finish because the chip starts thick and ends thin, but it requires a rigid machine setup. The bit tends to grab and pull the material aggressively. Conventional milling is safer for handheld and table routing as it pushes the material against the fence or operator control, maintaining stability.
Operators must balance spindle RPM and feed rates to achieve the target chip load. The chip load is the physical size of the chip removed by each flute per revolution. Calculating the correct chip load based on the bit's diameter and flute count prevents the tool from rubbing or taking too large a bite. Rubbing causes severe burning and destroys the carbide temper. Taking too large a bite causes premature tool wear, poor edge finish, or catastrophic breakage.
Cheap tooling often hides costs in poor runout tolerances, thin carbide that cannot be resharpened, and a higher risk of catastrophic failure. A bit that shatters at 20,000 RPM is a severe safety hazard. Premium bits are defined by dynamic balancing, anti-kickback body designs that limit the depth of cut per revolution, and thick micro-grain carbide that withstands multiple professional sharpenings. Investing in quality tooling reduces sanding time and prevents ruined workpieces.
Insert router bits use replaceable solid carbide knives secured to a steel body with set screws. While the upfront cost is higher than traditional brazed bits, insert tooling offers a constant cutting diameter. When a brazed bit is sharpened, its diameter shrinks slightly, which alters the fit of precision joints. Insert tooling eliminates this issue and provides zero sharpening downtime. You simply rotate or replace the knife right on the machine.
Pitch, resin, and glue buildup increase friction, generating excess heat that destroys the carbide temper and shortens the bit's lifespan. A dirty bit cuts like a dull bit. Establish a regular protocol for chemical cleaning using dedicated resin removers. Inspect pilot bearings for smooth rotation and apply dry lubricant to prevent seizing. Send dull bits to a professional grinding service before they become too damaged to salvage.
Burn marks typically result from a feed rate that is too slow, an RPM that is too high, or a dull cutting edge. When the bit spins without advancing, friction scorches the wood. To mitigate burning, increase your feed rate to keep the tool moving, lower the spindle speed to reduce friction, or take lighter passes. Always ensure your bits are clean and sharp before starting a critical finishing pass.
Vibration degrades finish quality and destroys spindle bearings. Address machine-side issues by replacing worn collets regularly, checking for spindle runout with a dial indicator, and applying the correct torque to the collet nut. Tooling issues often stem from unbalanced bits or excessive stick-out from the collet. Insert the bit fully into the collet, then back it out about 1/8-inch before tightening to prevent the collet from binding on the transition radius.
Never attempt to cut the full profile depth in a single pass if it exceeds the bit's diameter. The general rule of thumb is to limit the depth of cut to half the bit's cutting diameter per pass. Taking multiple shallower passes reduces stress on the bit, the router motor, and the workpiece. This practice ensures a cleaner final pass and drastically reduces the risk of kickback.
Audit your current tooling inventory and discard any bits with chipped carbide, severe burn marks, or seized bearings to maintain shop safety.
Upgrade your core straight and flush-trim bits to solid carbide spiral geometries to immediately improve cut quality and reduce sanding time.
Implement a strict cleaning schedule using resin removers to keep cutting edges free of pitch buildup, extending the life of your investment.
Calculate and document the optimal feeds and speeds for your most common materials to eliminate guesswork during setup.
A: An upcut bit pulls chips out of the cut, making it excellent for deep grooves but prone to causing top-surface tear-out. A downcut bit pushes chips downward, leaving a clean top edge but risking heat buildup in blind pockets if chips cannot escape.
A: A 1/2-inch shank has significantly more mass, which reduces vibration and tool deflection under heavy loads. This results in cleaner cuts, less chatter, and extends the overall life of the bit and the router bearings.
A: Standard woodworking bits are not optimized for aluminum. You need single-flute "O-flute" geometries designed to evacuate chips quickly and prevent the metal from heating up and galling onto the cutting edge.
A: Burn marks are caused by excessive friction and heat. Increase your feed rate, lower your router's RPM, ensure the bit is sharp and free of pitch, and take multiple shallow passes instead of one deep cut.
A: Compression bits feature both upcut and downcut geometries on the same flute. They pull the material toward the center of the cut, making them ideal for cutting delicate veneered plywood and melamine without chipping the top or bottom edges.
