Views: 0 Author: Site Editor Publish Time: 2026-04-17 Origin: Site


Assembly work often introduces a frustrating reality. Makers drive screws directly into pre-drilled pilot holes. This action frequently triggers the "wedge effect." It splits expensive hardwoods, tears delicate softwood surfaces, and leaves metal hardware protruding awkwardly. You must properly prepare material surfaces to avoid these costly failures. Countersink Bits serve as far more than basic drilling accessories. They are highly engineered cutting tools specifically designed to match fastener geometry. They reduce material scrap and ensure long-term structural joint stability.
This article provides a comprehensive evaluation framework for you. You will learn how to evaluate specific cutting angles, flute designs, and modular tooling systems. Read on to master the mechanical principles of flush seating and build cleaner, stronger assemblies.

Fastener Matching is Critical: Mismatching the countersink angle (e.g., using an 82° bit for a 90° metric screw) causes point-loading, which can snap fastener heads.
Material Dictates Tool Choice: Single-flute or cross-hole designs are optimal for metal and smooth finishes, while multi-flute bits excel in wood.
Depth Rules Vary: Softwoods and plastics require slightly deeper countersinking to absorb material swelling, whereas hard metals require an exact flush cut.
Tooling Efficiency: Upgrading from standalone bits to combination or quick-change flip-style tools drastically reduces production time and labor costs per hole.
We must first frame the core business problem of assembly. Standard screws feature a distinct V-shaped profile under their heads. When you force a standard screw into a flat-bottomed hole, the head acts exactly like a mechanical wedge. It exerts intense outward lateral pressure against the surrounding material. Driving hardware flush without an appropriate relief angle forces the fibers apart. This tension causes immediate splitting near material edges. It also triggers ugly tearing in softer stock.
Countersinking offers a precise conical relief solution. These specialized cutters remove material at a predetermined angle. They create a perfect conical recess. This recess strictly mirrors the underside of your chosen screw head. The mechanical advantage is significant. The recessed shape transfers the holding pressure downward into the substrate. It completely eliminates outward radial stress.
Adopting this approach yields measurable structural benefits. Flush seating prevents protruding hardware from snagging on clothing or passing objects. It instantly improves aesthetic professionalism. More importantly, it creates enhanced joint stability. Friction distributes evenly across the entire surface area of the screw head. This even distribution resists vibrational loosening over time. Reducing split parts directly impacts your total cost of ownership (ROI). You waste fewer expensive materials and spend less time reworking damaged components.
Buyers face numerous options when selecting cutting tools. We categorize these solutions based on their structural operation and chip evacuation methods. Understanding these structural differences helps you select the perfect tool.
Tool manufacturers design single-flute tools primarily for soft materials and metalwork. They vibrate far less during operation. The single cutting edge maintains continuous engagement. You achieve smoother finishes in plastics and aluminum.
Multi-flute options typically feature four or five cutting edges. They represent the industry standard for woodworking. They cut aggressively and remove material quickly. However, they require stable, confident handling. Unsteady hands will cause the multiple edges to catch the wood grain and induce tear-out.
Cross-hole models feature a completely different geometry. They utilize a solid conical body containing a single angled hole. They do not use external flutes at all.
Our evaluation shows they deliver the smoothest possible cut. They also provide exceptionally fast chip ejection. The internal hole funnels waste material away from the cutting face. They represent the ideal choice for clean, professional finishes. Expect to pay a higher price point for this specialized zero-flute design.
Shop efficiency relies heavily on your operational format. Let us examine the three main tooling approaches.
Standalone / Two-Step: You drill a pilot hole first. Next, you swap your bits. Finally, you cut the conical recess. This method carries a very high time-cost during repetitive tasks.
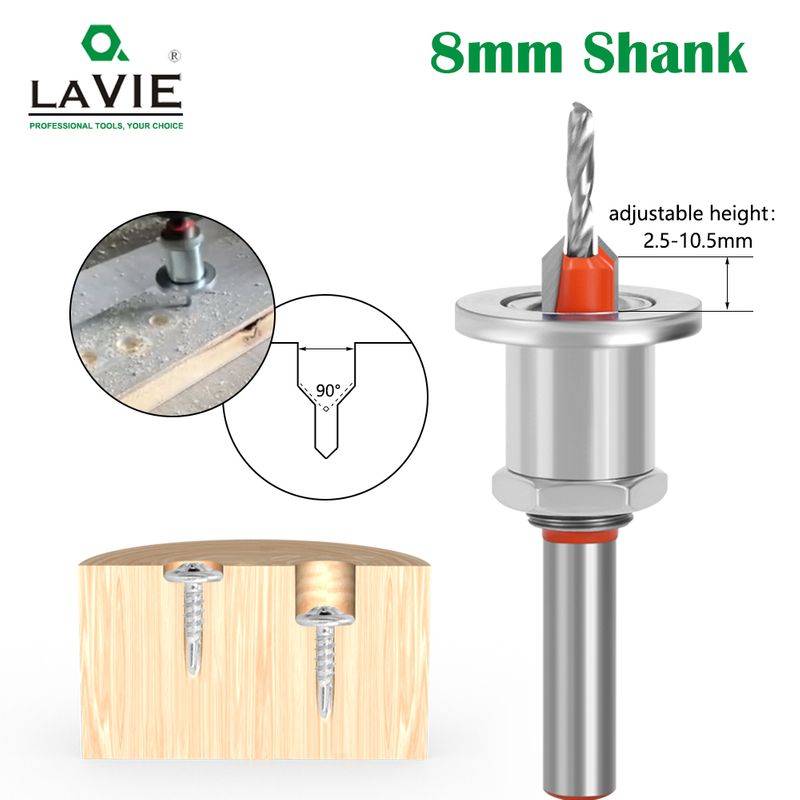
Combination Bits: These units drill and cut the recess simultaneously. You secure a standard twist drill inside the cutting collar. You adjust the depth precisely using a small setscrew.
Flip-Style Quick-Change Systems: These represent the highest tier of assembly efficiency. They feature a double-ended design. You drill and cut the recess on one side. You flip the chuck. You drive the screw using the opposite side.
Consider the following summary chart comparing flute designs for quick reference:
Flute Design | Primary Material | Vibration Level | Finish Quality |
|---|---|---|---|
Single-Flute | Plastics, Aluminum | Very Low | Excellent |
Multi-Flute (4-5) | Hardwoods, Softwoods | Moderate | Good (Fast Cut) |
Cross-Hole (Zero) | Metals, Finish Woods | Extremely Low | Superior |
Angle mismatch represents the most common point of failure during implementation. Screws adhere to strict international manufacturing geometries. Your cutting tool must match these specifications precisely.
The 82-degree angle serves as the unified standard for North American fasteners. Most US imperial wood screws and machine screws use this profile. Conversely, the 90-degree angle dominates the ISO metric standard. Most metric hardware sold globally requires a 90-degree recess.
You will also encounter several specialty angles. Manufacturers use 60-degree profiles primarily for simple pipe deburring. The aerospace industry relies heavily on 100-degree fasteners to distribute stress across thin aircraft skins. Heavy-duty sheet metal rivets often require wide 120-degree profiles.
We must examine the snapped screw risk in detail. Imagine driving an 82-degree imperial screw into a 90-degree metric hole. The steeper screw head fails to make contact along the upper sidewalls. The recess provides zero side support. Consequently, all rotational torque and downward pressure concentrate at the very bottom tip of the screw head. This extreme point-loading frequently causes softer fasteners to fail. Brass and stainless steel screws will easily snap off inside hardwood boards under these conditions.
Here is a quick reference chart mapping standard angles to their typical applications:
Degree Angle | Standard System | Common Application |
|---|---|---|
60° | General Machining | Hole deburring, edge breaking |
82° | Unified/Imperial | US standard wood/machine screws |
90° | ISO Metric | European/Global metric hardware |
100° | Aerospace Standard | Aircraft skins, thin panel riveting |
Material density strictly dictates your tooling choice. It also influences your target drilling depth and ideal operating speed.
Woodworking introduces unique organic dynamics. Softwoods like pine are highly porous. They remain prone to tearing and crushing under pressure. You should cut the recess slightly deeper than the screw head. This extra depth absorbs surface swelling when the screw finally tightens. Hardwoods like oak and walnut behave differently. They possess virtually zero elasticity. They require an exact flush cut. Driving a screw too deep into oak forces the head to act like a wedge, potentially snapping the hardware.
Metalworking demands stricter machinist guidelines. You absolutely must use High-Speed Steel (HSS) or Carbide tooling. Carbon steel will lose its temper and dull instantly. We recommend 1,500 to 2,000 RPM as a safe starting point for general metal applications. Adjust your speeds based on chip formation.
Machine shops also adhere to strict pre-tapping rules. You should always cut the conical recess before tapping the internal threads. The smooth, angled rim guides the tap directly into the hole center. This simple sequencing protects fragile tap threads from chipping against sharp entry edges.
We must note a clear alternative tooling distinction. Some makers confuse vertical plunge tools with edge-profiling equipment. Router Bits (such as V-groove or chamfering profiles) run continuous angled cuts along the outside edges of materials. They spin at extreme velocities. Conversely, plunge cutters are strictly engineered for localized, vertical hole operations. They operate at much lower RPMs to handle localized chip clearing.
Shop floor realities often differ from theoretical guidelines. Operators frequently encounter rough finishes and wandering holes. We can correct these common flaws through simple technique adjustments.
Chatter manifests as rough, wavy patterns left on the inside of the hole. Operators see this most frequently in metalwork. It occurs due to harmonic resonance. The tool bounces rhythmically against the material surface, leaving a faceted finish.
You can fix this by following a basic machinist rule. First, decrease your spindle speed significantly. Second, increase your downward feed pressure. This combination forces the cutting edge to bite into the material rather than skip across it. You can also upgrade to cutters featuring unevenly spaced flutes. This asymmetrical design breaks harmonic vibration naturally.
Wandering occurs when the bit drifts off-center during the initial plunge. Tear-out happens when the tool violently rips the wood grain rather than slicing it cleanly.
Follow these specific steps to eliminate wandering and surface damage:
Always use a sharp steel awl or automatic center punch to mark the hole location firmly.
Never use dull cutters. Dull edges crush fibers instead of shearing them, representing a massive hidden cost in ruined stock.
Secure an adjustable depth stop collar onto the tool shank.
Let the depth stop dictate the final plunge depth rather than relying on inconsistent visual guesswork.
Treating countersinks as precision instruments rather than generic drill bits transforms your assembly process. It saves considerable time, protects expensive materials, and prevents hardware failure. Proper joint seating ensures aesthetic perfection and guarantees long-term structural integrity.
Take action today by auditing your workshop inventory. Identify your most commonly used fasteners to determine your primary angle requirement. Decide whether your shop runs mostly on 82-degree imperial screws or 90-degree metric hardware. Finally, invest in HSS combination tools or premium cross-hole designs. Upgrading your tooling systems will easily pay for itself through higher production efficiency and flawless material finishes.
A: Yes, but extreme care is needed due to the thin material. Use low speeds, apply high-quality cutting fluid, and maintain even downward pressure. You must use a bit specifically rated for metal. Proceed cautiously to avoid distorting or tearing the thin metal sheet.
A: It is highly discouraged. A larger standard drill bit leaves a stepped, flat-bottomed ridge rather than a precise taper. This incorrect geometry results in extremely poor fastener seating, point-loading on the screw head, and substantially weaker structural joints.
A: A countersink creates a shallow V-shaped, conical recess designed for flat-head screws to sit flush. A counterbore creates a much deeper flat-bottomed, cylindrical recess. Makers use counterbores to completely hide a socket-cap screw or cover a screw head beneath a wooden plug.


