
Views: 0 Author: Site Editor Publish Time: 2026-09-06 Origin: Site


Selecting the wrong tooling for your router carries high stakes in any woodshop. Poor-quality cutters lead to severe tear-out, ruined hardwood stock, and dangerous kickback. This holds true regardless of your router's horsepower. Woodworkers face an oversaturated market filled with thousands of bit profiles and varying carbide grades. Massive, low-cost sets obscure which cutters you actually need for structural joinery versus decorative finishing. You need a reliable way to cut through the noise and build a functional tool library without wasting money on useless profiles.
This guide introduces a technical evaluation framework for selecting Woodworking Router Bits. We base this framework on shank mass, cutting geometry, material composition, and project-specific cut requirements. By understanding the physical mechanics of how a bit interacts with wood fibers, you can avoid costly mistakes, prevent workpiece damage, and achieve flawless profiles on every pass.
Prioritize 1/2-inch shanks over 1/4-inch shanks whenever the router collet allows, as the increased mass drastically reduces vibration, chatter, and deflection during heavy cuts.
Invest in micro-grain carbide-tipped or solid carbide bits over High-Speed Steel (HSS) for superior edge retention, especially when milling abrasive materials like plywood or MDF.
Build a foundational toolkit focused on utility and joinery (straight, slot-cutting, flush-trim, rabbeting) before investing in highly specialized edge-forming profiles.
Evaluate router bit starter kits based on the inclusion of interchangeable bearings and core profiles, avoiding 50-piece sets that compromise on carbide thickness and bearing quality.
Failing to match the bit's physical specifications to the router's capabilities results in poor cut quality. It also causes premature tool wear and introduces safety hazards. You must match the tooling to the material's density and the specific operation you intend to perform. Understanding the anatomy of your cutters prevents ruined projects.
The physics of shank diameter directly impact your routing success. A 1/2-inch shank offers four times the mass of a 1/4-inch shank. This increased mass fundamentally changes how the tool performs under load. Heavier shanks absorb vibration and reduce chatter. They also dissipate heat much more effectively during extended routing sessions. When you push a bit through dense maple or oak, a thin shank flexes. This deflection causes a rippled finish on the wood edge.
When analyzing longevity and cost-efficiency, the upfront cost of larger shanks makes sense. They run cooler and last significantly longer. Most importantly, they prevent expensive workpiece ruin caused by bit deflection. Establish strict selection criteria for your shop. Mandate 1/2-inch shanks for bits with a cutting diameter over 1 inch. Use them exclusively for dense hardwoods. Reserve 1/4-inch shanks strictly for trim routers or light-duty detail work where a larger router cannot fit.
The choice between High-Speed Steel (HSS) and Tungsten Carbide dictates the lifespan of your tooling. HSS takes a sharper initial edge. However, it suffers from rapid dulling. This makes HSS suitable only for softwoods or single-use custom profiles. Milling abrasive materials like MDF or plywood will destroy an HSS edge in minutes. The glue in sheet goods acts like sandpaper against steel.
The standard for professional and serious hobbyist use relies on carbide. Micro-grain carbide-tipped bits offer excellent longevity for standard profiles. Solid spiral carbide excels at aggressive material removal. These materials withstand high heat and abrasive glues found in modern sheet goods. You will spend less time changing bits and more time cutting.
Material Type | Edge Sharpness | Durability | Best Application |
|---|---|---|---|
High-Speed Steel (HSS) | Extremely High | Low | Softwoods, single-use custom runs |
Carbide-Tipped | High | High | General woodworking, hardwoods, edge forming |
Solid Carbide | High | Very High | Plywood, MDF, deep plunge routing |
The angle of the cutting edge impacts how the blade shears the wood fibers. Standard straight flutes utilize a chopping action. This can lead to tear-out on difficult grain. Shear-angle flutes use a slicing action. This slicing geometry reduces tear-out and leaves a cleaner finish. It mimics the action of a hand plane skewed across a board.
Spiral geometry takes this a step further. Upcut spirals pull chips out of the cut, making them ideal for deep mortises. Downcut spirals push fibers down, leaving a perfectly clean top surface on veneers. Compression bits combine both, pulling up from the bottom and pushing down from the top. This prevents chipping on double-sided veneers like melamine. Using the right geometry saves hours of sanding.
Structural woodworking requires specific tooling. You must focus on dimensional accuracy, joint strength, and overall utility. These bits form the foundation of any capable shop. Do not buy decorative profiles until you own these core utility cutters.
Straight bits serve as the workhorse for dadoes, grooves, and mortises. They handle the bulk of basic joinery tasks. Standard straight bits offer lower costs and perform adequately for edge routing. However, spiral plunge bits justify their higher cost. They provide superior performance for deep mortising and continuous chip extraction. A spiral bit cuts faster and leaves a cleaner wall inside the mortise.
Modern material realities demand specialized tooling. Standard 3/4-inch straight bits create sloppy joints in modern 23/32-inch cabinet plywood. Plywood is rarely true to its nominal dimension. We recommend undersized bits for exact-fit dado joinery in sheet goods. Sizes like 15/32-inch and 23/32-inch ensure snug, glue-ready joints without slop. A tight dado joint requires less clamping pressure and yields a stronger cabinet box.
Slot cutters utilize flat-ground 2-wing or 3-wing cutters mounted on an arbor. They cut precise slots for biscuit joinery, splines, and T-tracks. You will also use them for drawer bottom grooves and tongue-and-groove paneling. They are highly versatile tools for panel construction.
These bits offer a distinct safety and efficiency advantage. Slot-cutting bits provide exceptional stability. They deliver clean, flat-bottom cuts with minimal risk of burning. This compares favorably to using deep-plunging straight bits for the same tasks. The horizontal cutting action clears chips efficiently.
A rabbeting bit cuts recesses on the edge of stock. You use these recesses for cabinet backs, drawer fronts, and half-lap joints. The mechanics rely on a pilot bearing guiding the cutter along the material edge. A good rabbet joint provides mechanical strength and a large glue surface.
The multi-cut bearing strategy maximizes your investment. You can get six or more different cut depths out of a single rabbeting bit. You achieve this by swapping the interchangeable guide bearings. This converts a single bit to cut 1/8", 1/4", 5/16", 3/8", 7/16", and 1/2" depths. Buying a single high-quality rabbeting bit kit with interchangeable bearings offers a massive economic advantage over purchasing multiple dedicated-size bits.
Disconnect the router from its power source before making any adjustments.
Use a hex key to remove the retaining screw on the top of the rabbeting bit.
Slide off the current bearing and clean the arbor post to remove any pitch or dust.
Select the desired bearing size for your target rabbet depth and slide it onto the arbor.
Secure the retaining screw tightly, ensuring the bearing spins freely without binding.
Bearing-guided bits handle template routing and edge duplication. They allow you to perfectly match a workpiece to a master template. Top-bearing bits, known as pattern bits, ride on a template placed on top of the wood. Bottom-bearing bits, known as flush-trim bits, ride on a template placed underneath. They are essential for curved furniture parts.
Your choice depends on your router orientation. Table-mounted routing often favors bottom-bearing bits for visibility. Handheld routing frequently utilizes top-bearing bits to keep the template in clear view. Having both types in your shop allows you to route with the grain, reducing tear-out on complex curves.
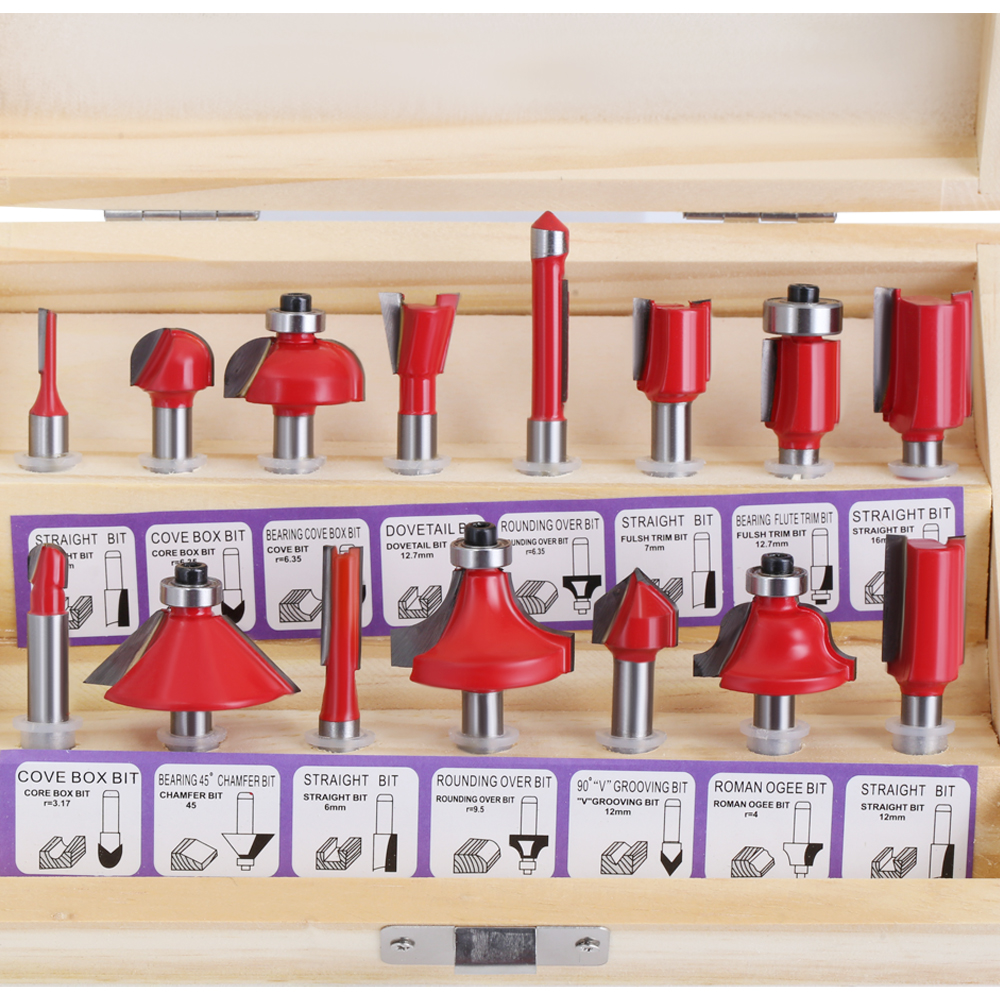
Once you secure your joinery tooling, you need bits to finish exposed wood edges. These profiles soften, protect, or decorate your projects. They turn square stock into finished furniture.
Softening sharp edges provides tactile comfort and structural durability. It also improves finish adhesion, as paint and clear coats pull away from sharp corners. A roundover bit achieves this smooth transition. You will use a 1/8-inch or 1/4-inch roundover on almost every project you build.
You can maximize bit versatility with a simple adjustment. Lowering the depth of a roundover bit exposes the top step of the cutter. This converts a simple roundover into a decorative beading profile. This trick saves you from buying dedicated beading bits for occasional decorative work.
The 45-degree chamfer bit creates clean, modern beveled edges. It removes sharp corners quickly and consistently. Beyond simple edge treatment, it offers secondary utility. You can use it to create hidden joinery or V-grooves. It also cuts the precise angles needed for multi-sided box joints, such as coopered columns or hexagonal boxes. A chamfer bit is highly forgiving and rarely causes tear-out.
Cove and Roman Ogee bits outline classic decorative profiles. You see these on furniture edges, baseboards, and architectural molding. Cove bits also handle specialized functional joinery. You utilize cove bits to cut the female component of rule joints on classic drop-leaf tables. They add a traditional look to any piece.
Always exercise caution with large profile bits. You must make multiple shallow passes to prevent tear-out and burning. Attempting to cut a full profile in one pass causes severe motor strain and ruins the workpiece. Set the fence forward and gradually move it back until you reach the final depth.
Analyzing the economic and practical trade-offs of bulk buying helps you build a smart tool library. You must weigh the appeal of massive sets against the reliability of curated tooling. Buying smart saves you money and frustration.
Budget 30-to-50-piece sets hide harsh realities. They feature thin carbide brazing that chips easily. Poor dynamic balance causes severe router vibration. Cheap bearings frequently seize, spinning against the wood and marring the edge. Furthermore, these sets include obscure profiles that you will never use. You end up paying for filler.
Low-quality steel shanks pose serious safety risks. They can bend or snap under load, sending shrapnel across the shop. Never compromise on tooling safety for a lower upfront price. A broken bit can cause severe injury and destroy hours of hard work.
A high-quality kit makes sense if it meets strict criteria. Look for Router Bit Starter Kits containing 5 to 7 essential profiles. These should include straight-plunge, flush-trim, roundover, multi-bearing rabbeting, and chamfer bits. Ensure they feature 1/2-inch shanks and come from reputable manufacturing sources.
A premium starter kit reduces the initial cost-per-bit. It provides the foundational cuts needed for 90% of standard woodworking projects without saddling you with useless filler. You get reliable performance right out of the box.
Many woodworkers prefer à la carte purchasing based on immediate project needs. This shortlisting strategy ensures you only buy what you use. Start with a 1/2-inch shank spiral upcut bit for mortising. Add a 1/2-inch flush-trim bit for template work. Finally, acquire a multi-bearing rabbeting set for versatile joinery. Expand this custom set only when a specific project demands a new profile. This approach spreads out the cost and guarantees you own high-quality versions of your most-used tools.
Audit your current router collet capacity and upgrade to 1/2-inch tooling for all future purchases where applicable.
Discard any dull or damaged high-speed steel bits and replace them with micro-grain carbide equivalents to ensure clean cuts.
Purchase a multi-bearing rabbeting set to consolidate your edge-joinery capabilities into a single, versatile tool.
Plan your next project's joinery first, and buy only the specific Router Bits required to execute those exact cuts.
A: Burning usually occurs because the router RPM is set too high for the bit diameter, or your feed rate is too slow. Dull carbide edges or heavy pitch buildup on the bit can also generate excess friction. Clean your bits regularly and lower the router speed for larger profiles.
A: Yes, but you must use a high-quality 1/4-inch to 1/2-inch collet adapter or reducer sleeve. Ensure the adapter is fully seated and clean to prevent the bit from slipping during operation. Whenever possible, use a dedicated 1/4-inch collet if your router includes one.
A: An upcut bit pulls wood chips up and out of the cut, making it ideal for deep mortises, but it can splinter the top surface. A downcut bit pushes chips downward, leaving a perfectly clean top edge, which is excellent for routing veneers or dadoes.
A: A dull bit requires excessive force to push through the wood, leaves a rough or fuzzy finish, and frequently causes burn marks. If cleaning the pitch off the bit does not improve performance, the carbide edges likely need professional sharpening or replacement.
A: Yes, bearing-guided bits are designed for both handheld and table-mounted routing. The bearing rides along the edge of the workpiece or a template, controlling the depth of cut. Always ensure the bearing spins freely before starting the router.
A: No. Large, inexpensive sets usually compromise on carbide quality and bearing durability. You will likely only use a fraction of the profiles included. It is much better to invest in a smaller, high-quality starter kit or buy individual bits as your projects require them.


